When you register your child for an activity, your confirmation email will be sent from the following email address: [email protected]. This email will include an invitation to activate your account, which expires after 7 days. Activating your account allows you to access all the benefits of the Parent Portal, including easily viewing your kids’ schedules, finding activity details, and submitting cancellation requests.
If your activation link expires, please contact [email protected] to have a new link sent.
You can update or reset your password in two places:
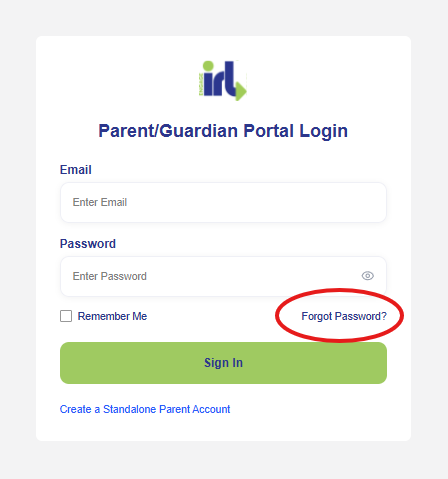
- Before logging into the Parent Portal, select “Forgot Password?” to reset your account password. You will be prompted to submit your email address, and a link will be sent to complete your password reset.

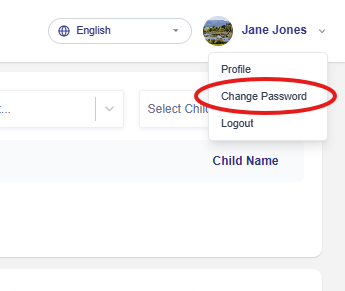
- In the Parent Portal, select your name in the upper right corner, then select “Change Password”. Follow the prompts and select “Update Password”.
You can update the email address associated with your account in two places:
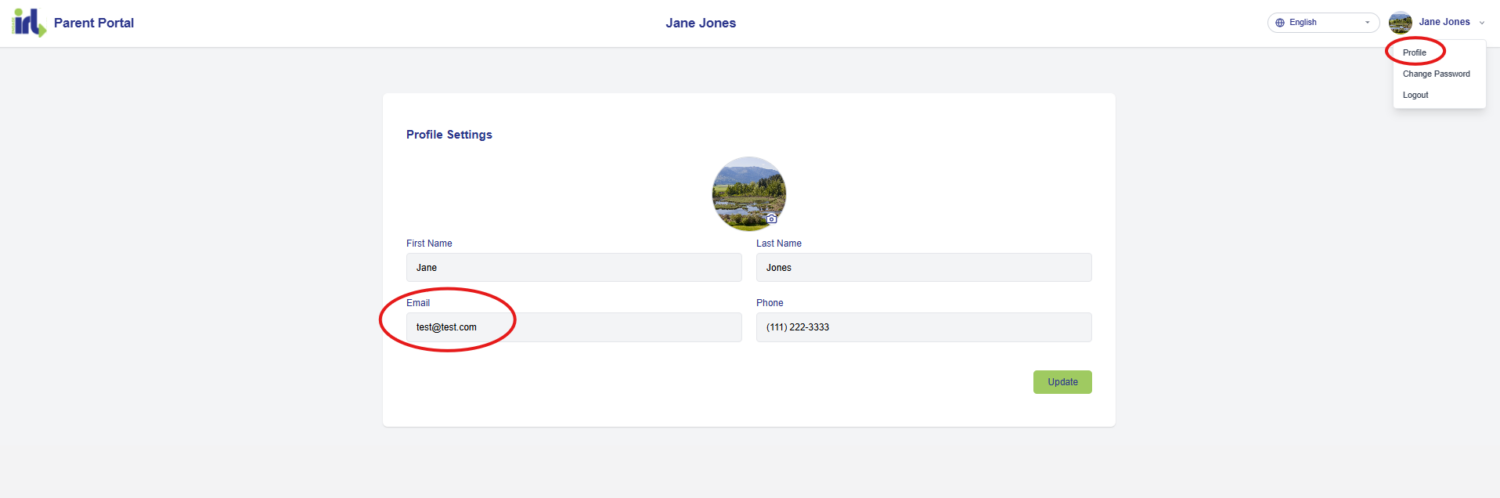
- In the Parent Portal, select your name in the upper right corner, then select “Profile”. Under “Profile Settings”, you can edit your email address, phone number, and name. Once you’ve completed your changes, select “Update”.
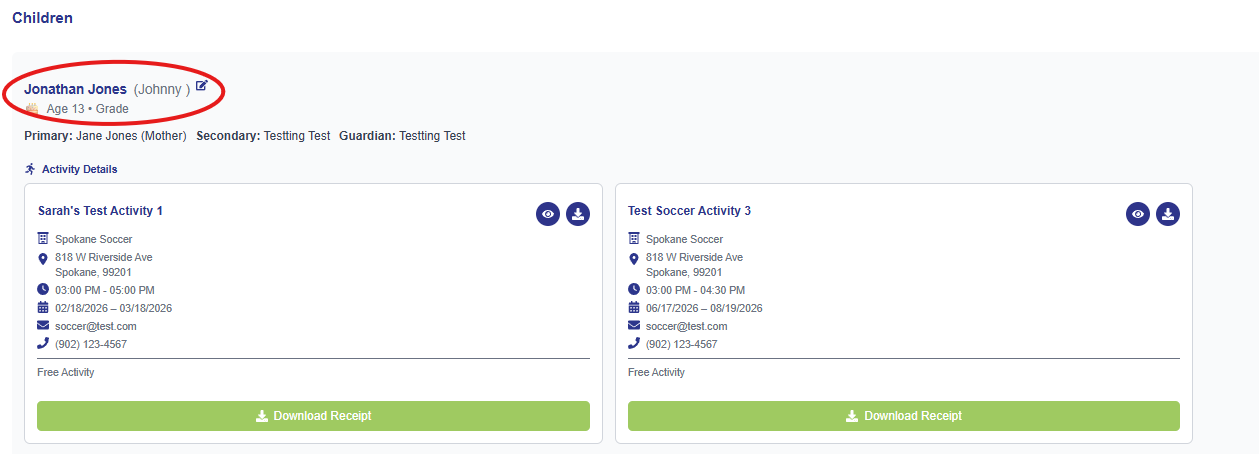
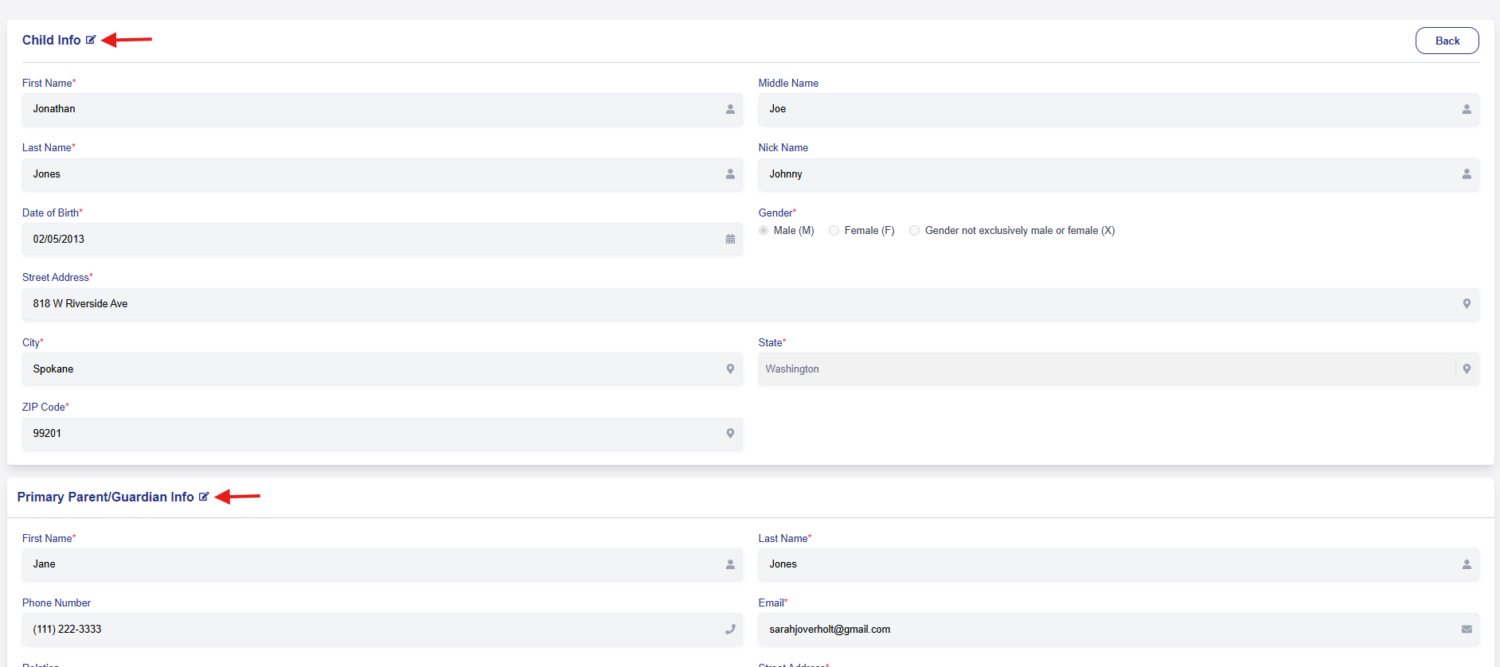
- From the homepage of the Parent Portal, under “Children”, select one of your children’s names. Scroll past “Child Info” and select the edit symbol next to “Primary Parent/Guardian Info”. Make desired edits to your personal details including name, phone number, email, relation, and address. Once you’ve completed your changes, scroll to the bottom of the page and select “Save”.
Update Parent/Guardian Information:
- In the Parent Portal, select your name in the upper right corner, then select “Profile”. Under “Profile Settings”, you can edit your email address, phone number, and name. Once you’ve completed your changes, select “Update”. Edit additional details, like your address, by following the process below, listed under “Update Child Information”.
Update Child Information:
- From the homepage of the Parent Portal, under “Children”, select one of your children’s names. Select the edit button next to “Child Info” and make your desired edits. Once you’ve completed your changes, scroll to the bottom of the page and select “Save”. On this page, follow the same process to edit “Primary Parent/Guardian Info”, “Secondary Parent/Guardian Info” and/or “Family Members” info.
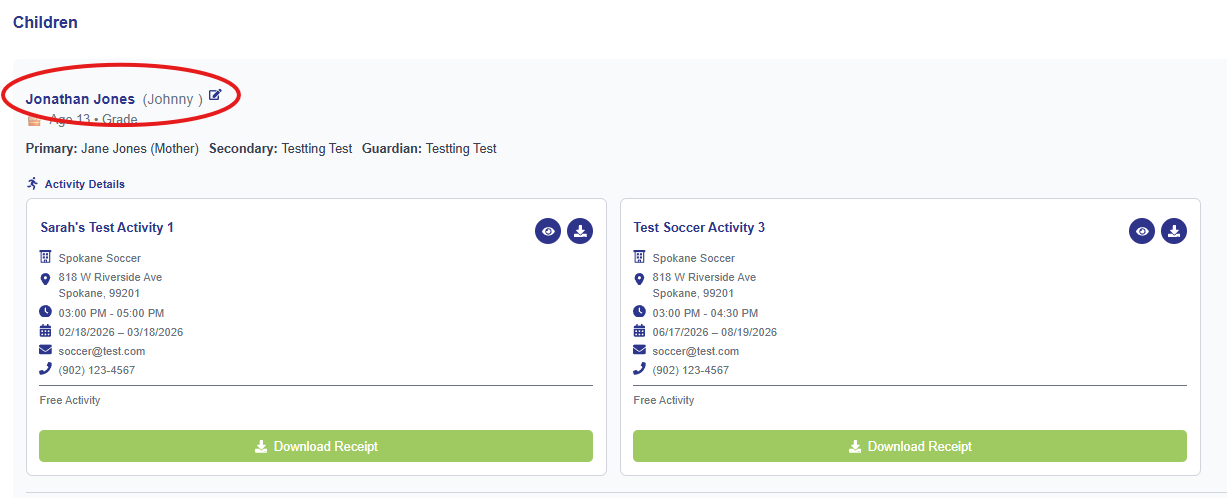
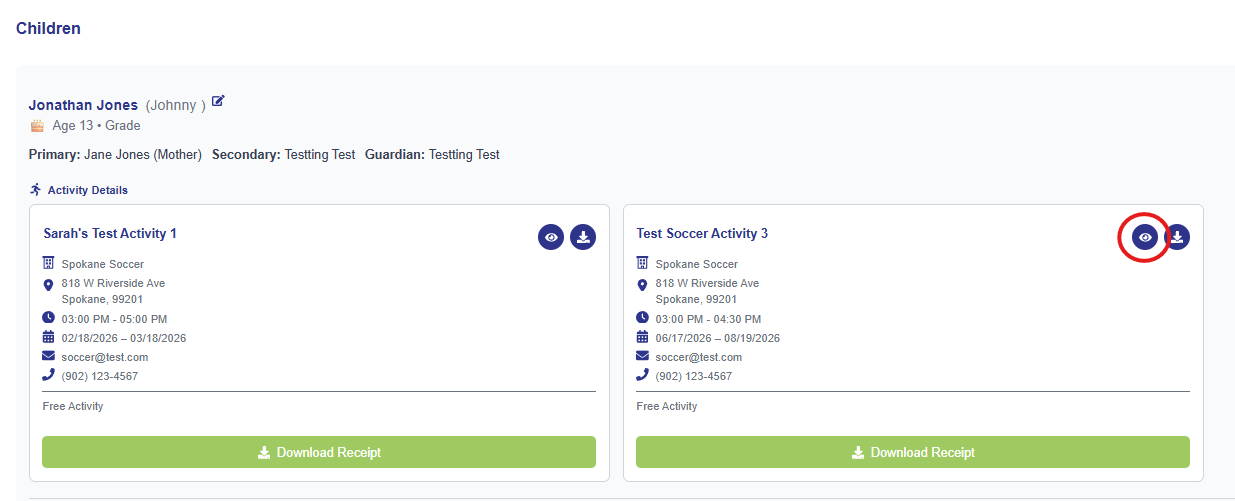
If you have a question about an activity your child is registered for, please contact the hosting organization directly. To locate the organization’s contact information, select the view icon next to the activity name (under “Children” on the homepage of the Parent Portal). Under “Activity Details”, you’ll find the organization’s contact information, including their phone number and/or email address.
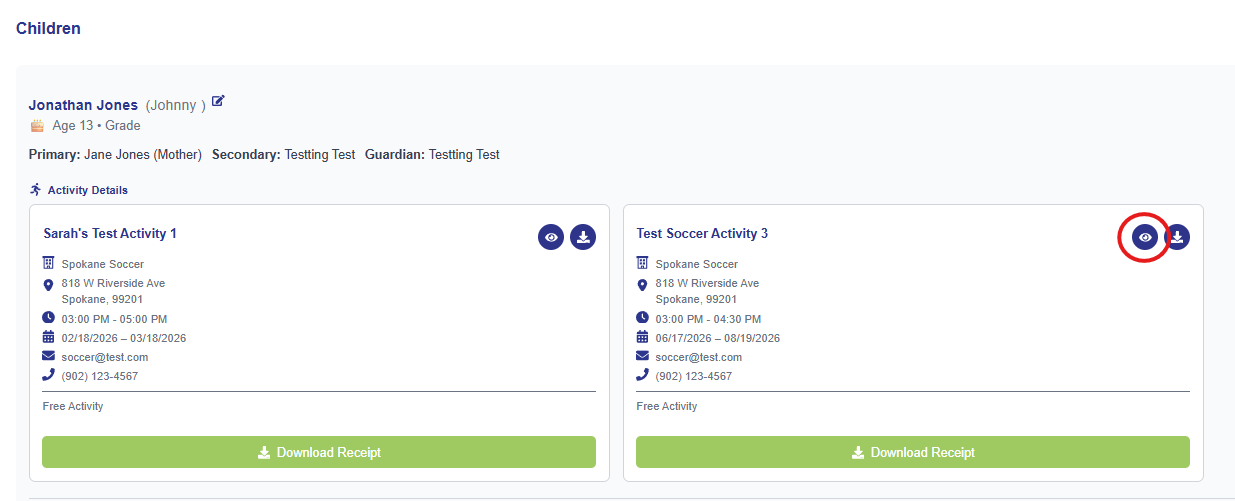

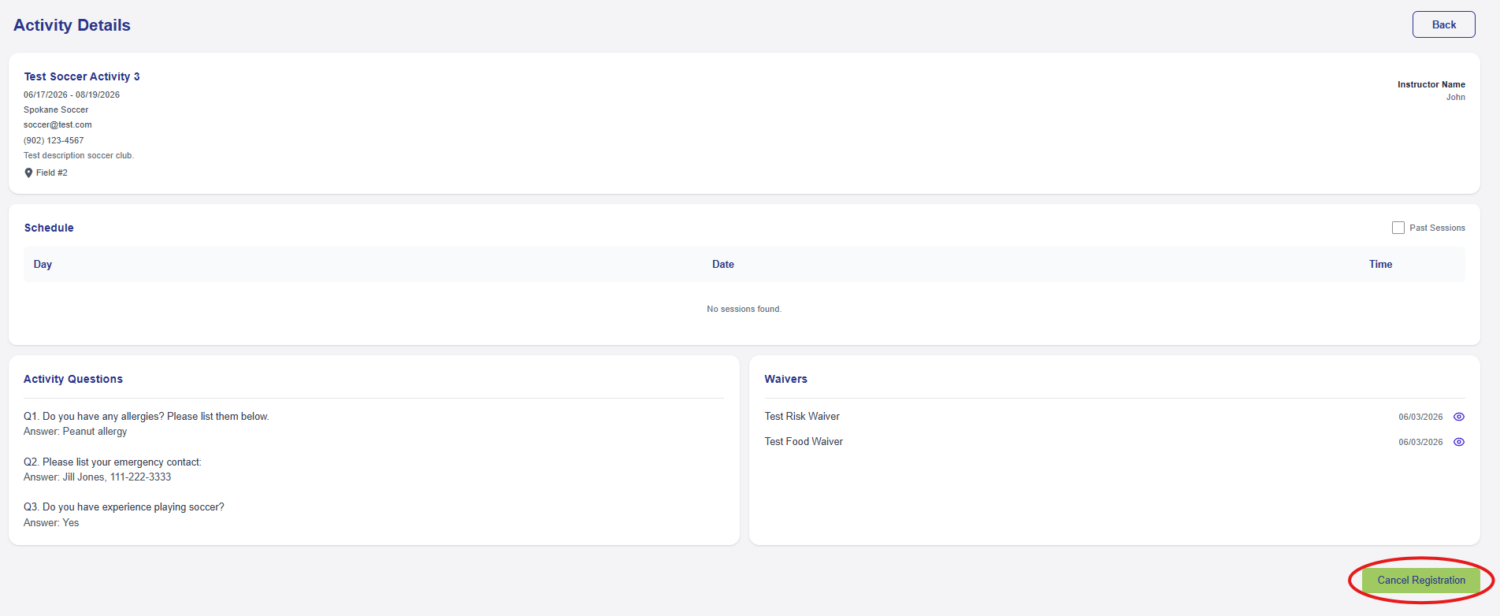
To cancel your child’s activity, please submit a cancellation request through the Parent Portal. To submit a cancellation request, select the view icon next to the activity name (under “Children” on the homepage of the Parent Portal). Scroll to the bottom of the activity page and select “Cancel Registration”. Follow the prompts to submit your cancellation request. Please note that your activity has not been cancelled until your request is approved by the hosting organization.
To add a new activity, select “Activities” in the lefthand sidebar. From the “Activities” page, select “Add” in the upper righthand corner. Complete the form and select “Publish” to add your activity. Here are a few helpful tips when adding a new activity:
Walk-In Registrations
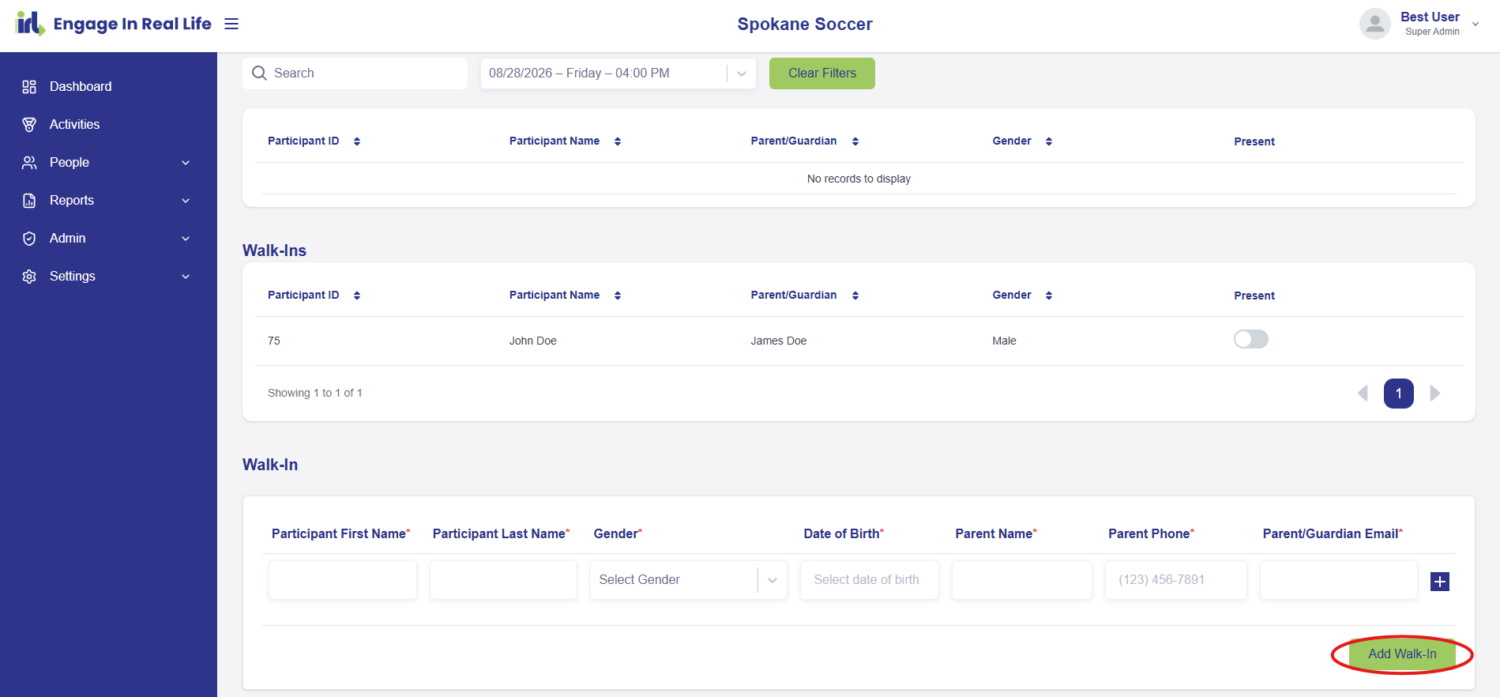
- Walk-in registration allows you to quickly add participants to your activity day-of. If you select “Yes” to “Allow Walk-In Registrations”, you will be able to add walk-ins under “Take Attendance” for your activity.
- Instead of using a walk-in registration, you can register a participant manually. Walk-in registration offers a simpler, faster option for keeping track of last-minute attendees. Account invitations will be sent to parent/guardian email addresses registered with walk-in participants.
Waitlist Registrations
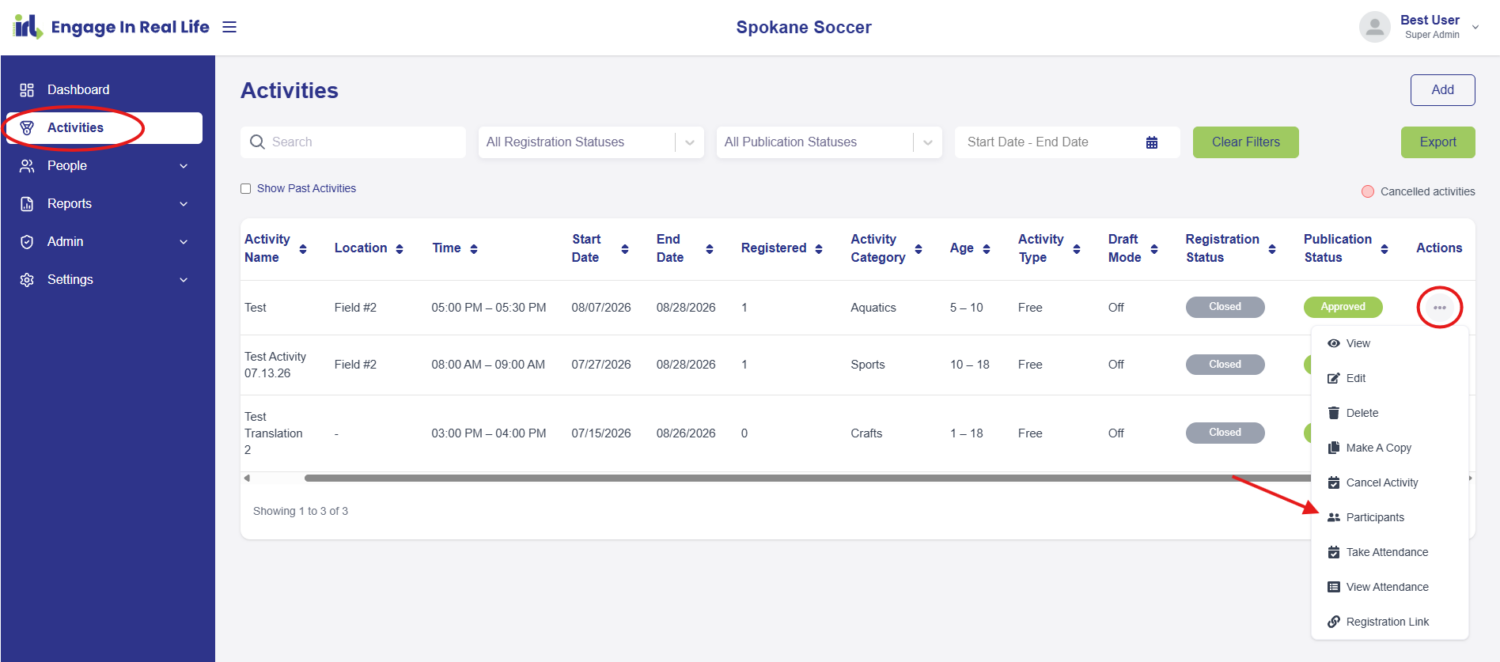
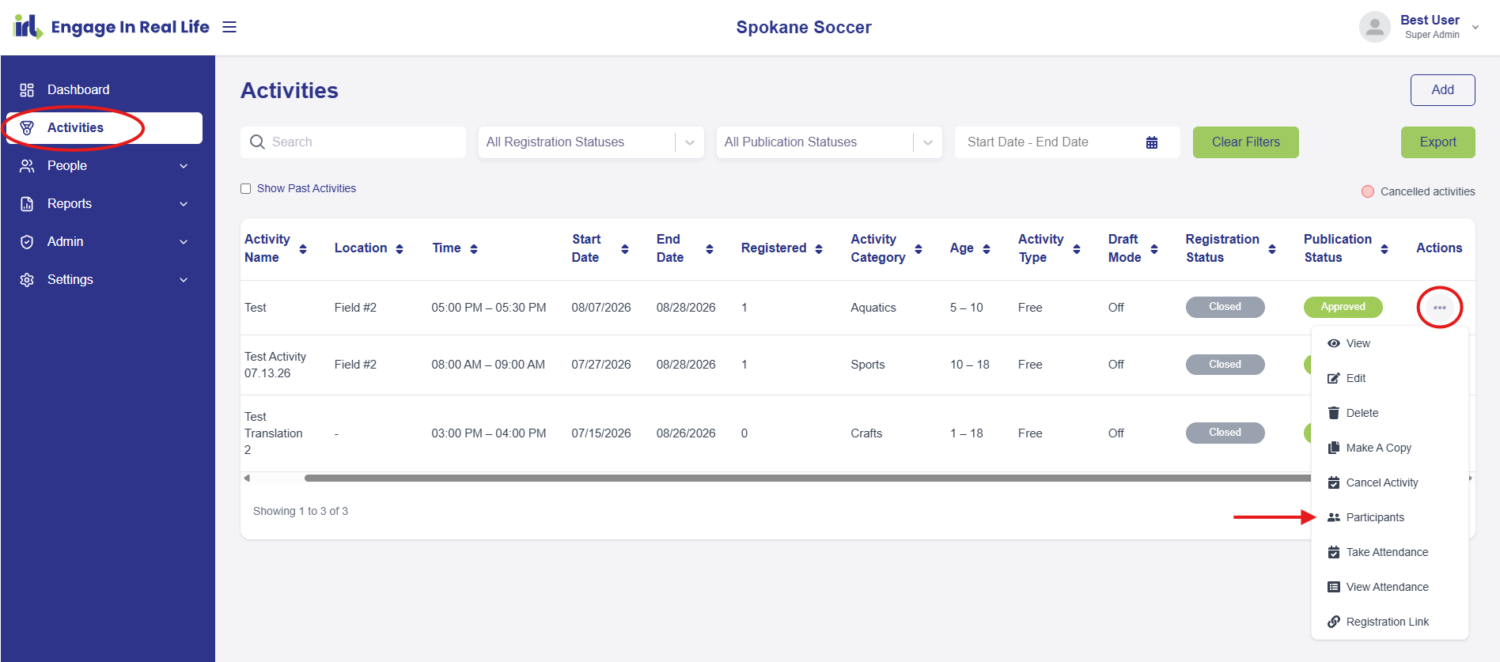
- If you select “Yes” under “Allow Waitlist Registrations”, interested individuals will be able to join your waitlist after your activity has reached capacity. To view waitlist details, select “Activities” in the lefthand sidebar. Go to your desired activity and select the three dots under “Actions”. Select “Participants”, the “Waitlist” section is located underneath your activity’s participants. Please note that waitlisted individuals will not be automatically added to your activity. If a spot becomes available, you will need to contact waitlisted parties and invite them to register.
Custom Questions & Translation
- Custom questions allow you to collect specific information from your activity participants during the registration process (e.g. “Do you have any allergies?”, “Have you played soccer before?”).
- Our translation feature allows activity registrations and the Parent Portal to be translated into 14 languages. When you create new custom questions, you will have the opportunity to review the translated versions of each question. If you are able to verify a language translation, please select “Verified” next to the question. This indicates that the translation has been reviewed for accuracy by your organization. Translations that have not been verified will be labeled “Auto-translated.”
After your activity is published, you can generate a registration link to send to potential participants, publish to your website, use in communications, and more. To generate this link, select “Activities” in the lefthand sidebar. Go to your desired activity and select the three dots under “Actions”. Select “Registration Link” and your custom link will be copied to your clipboard. Simply paste the link in your desired location, and you’re ready to start collecting registrations!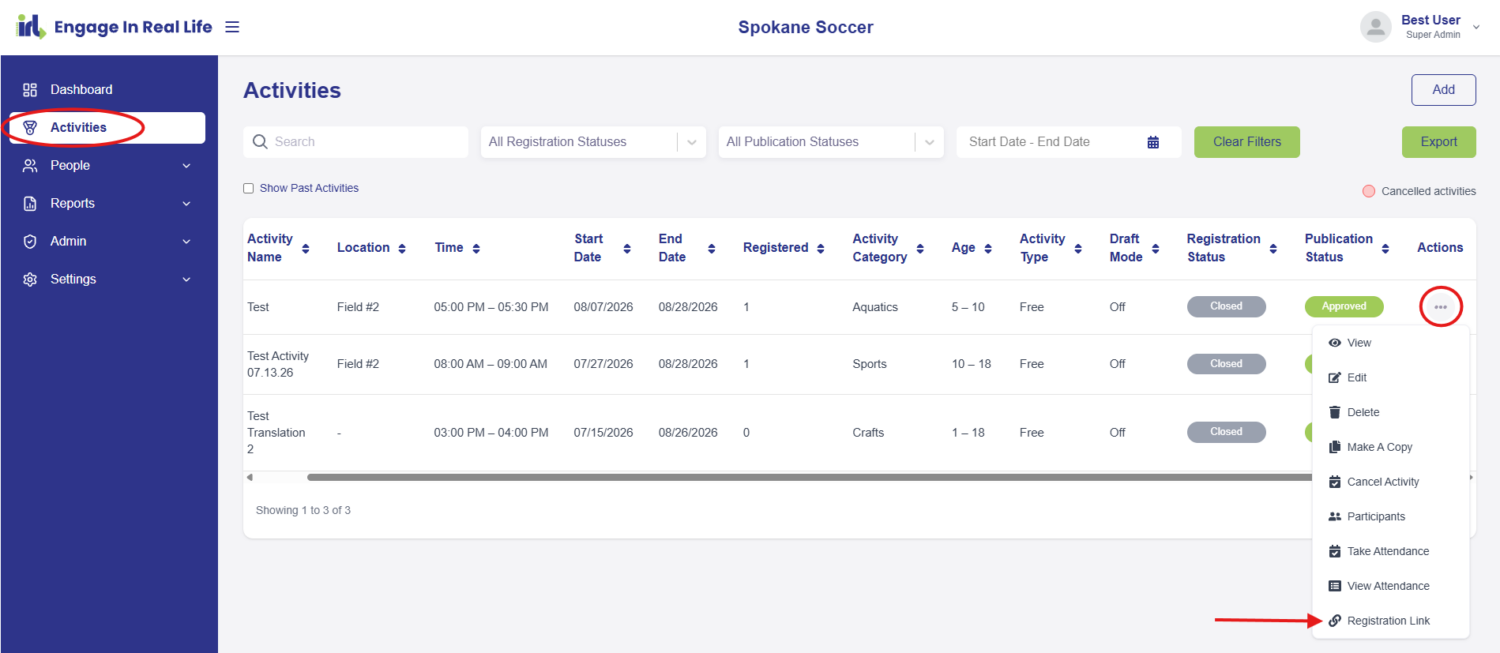
A participant can be manually registered for an activity in two places:
- Select “Activities” in the lefthand sidebar. Go to your desired activity and select the three dots under “Actions”. Select “Participants”. On the participants page, select “Add Participant” in the upper righthand corner. Complete the form to manually add a participant to your activity.
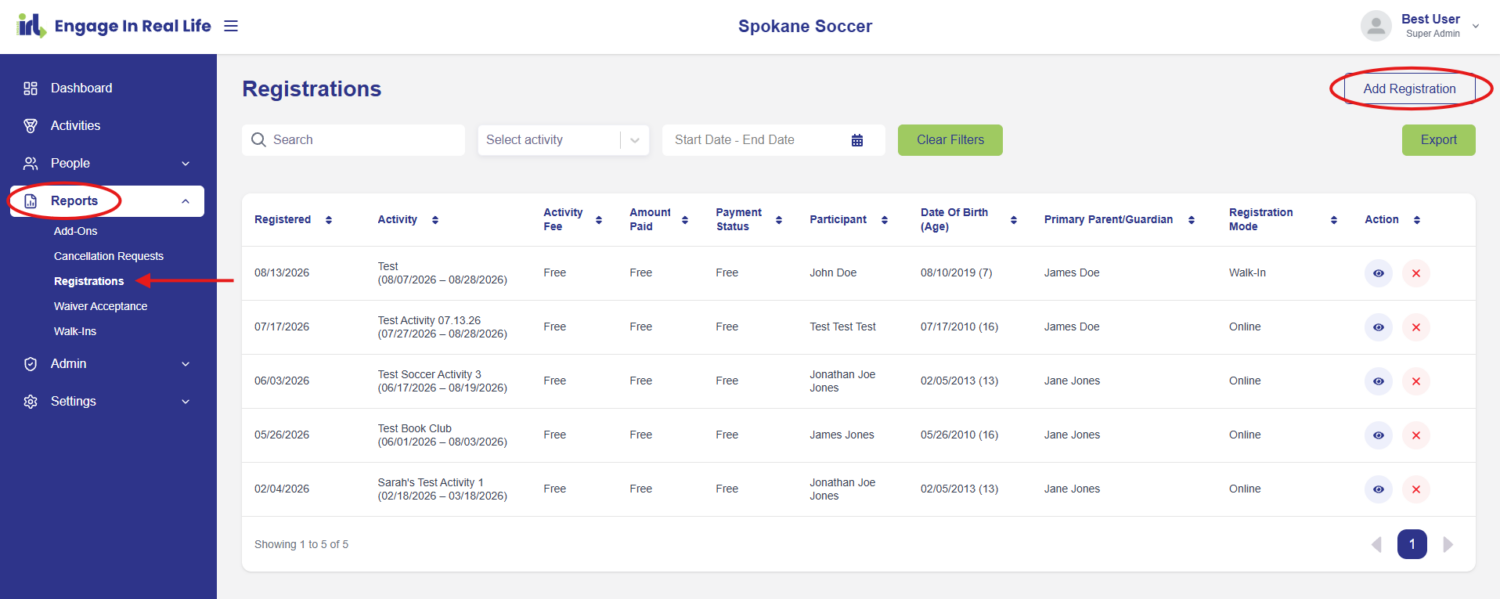
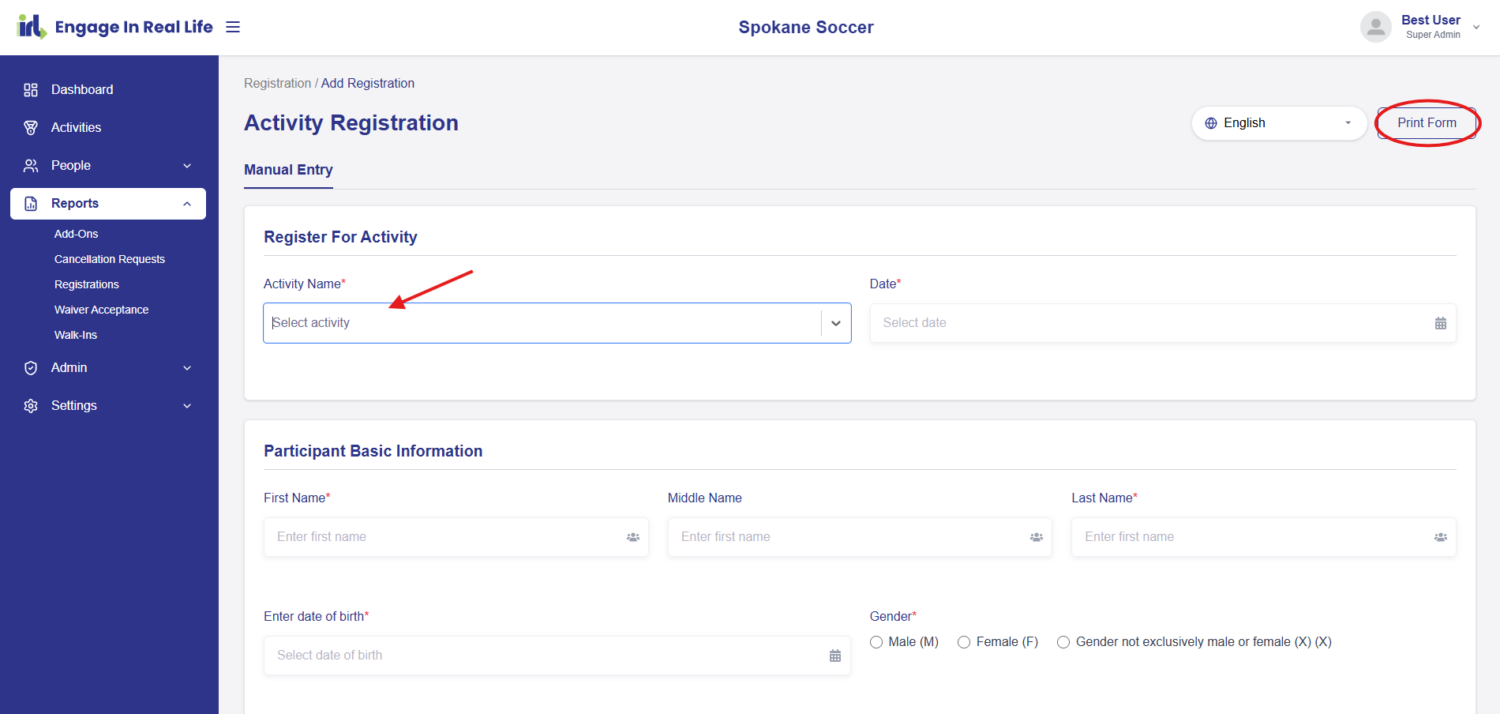
- Select “Reports” in the lefthand sidebar, under reports select “Registrations”. In the upper righthand corner of the registrations page, select “Add Registration”. Begin typing your desired activity into the “Activity Name” field and select your activity from the dropdown list. Complete the form to manually add a participant to your activity.
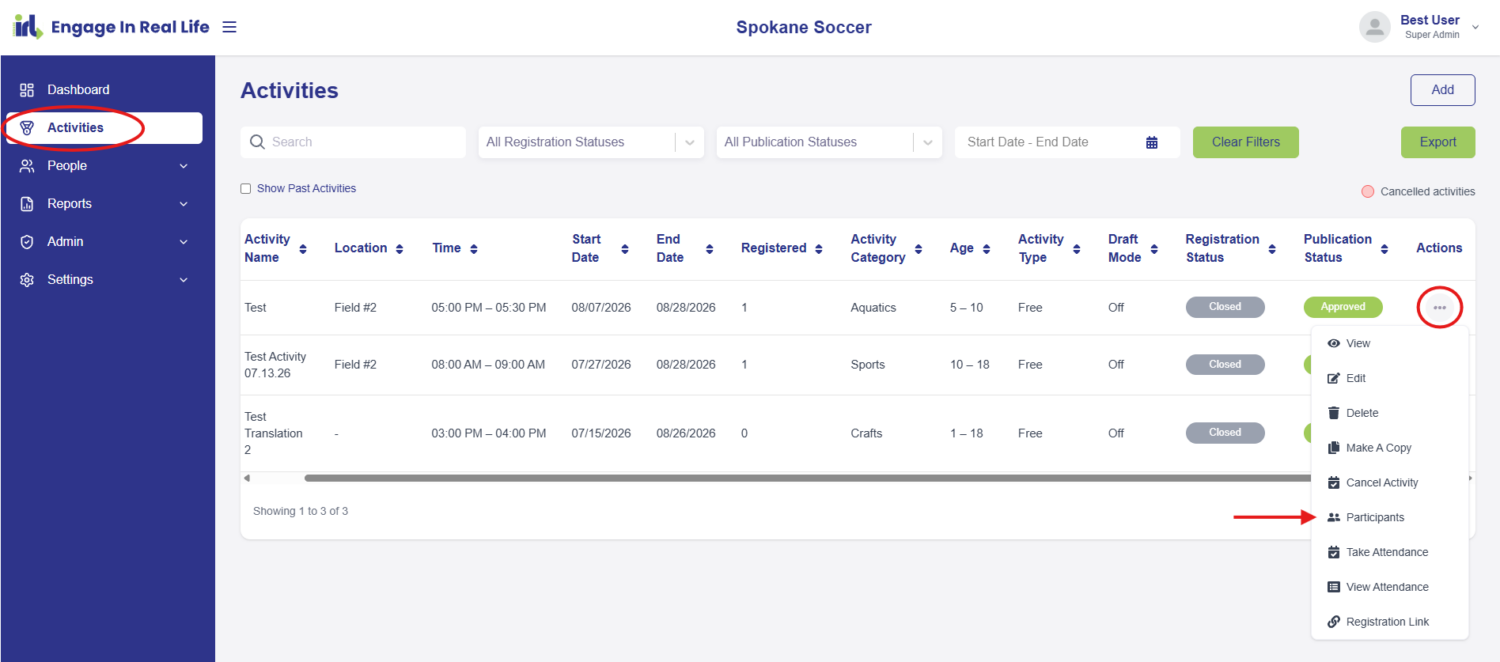
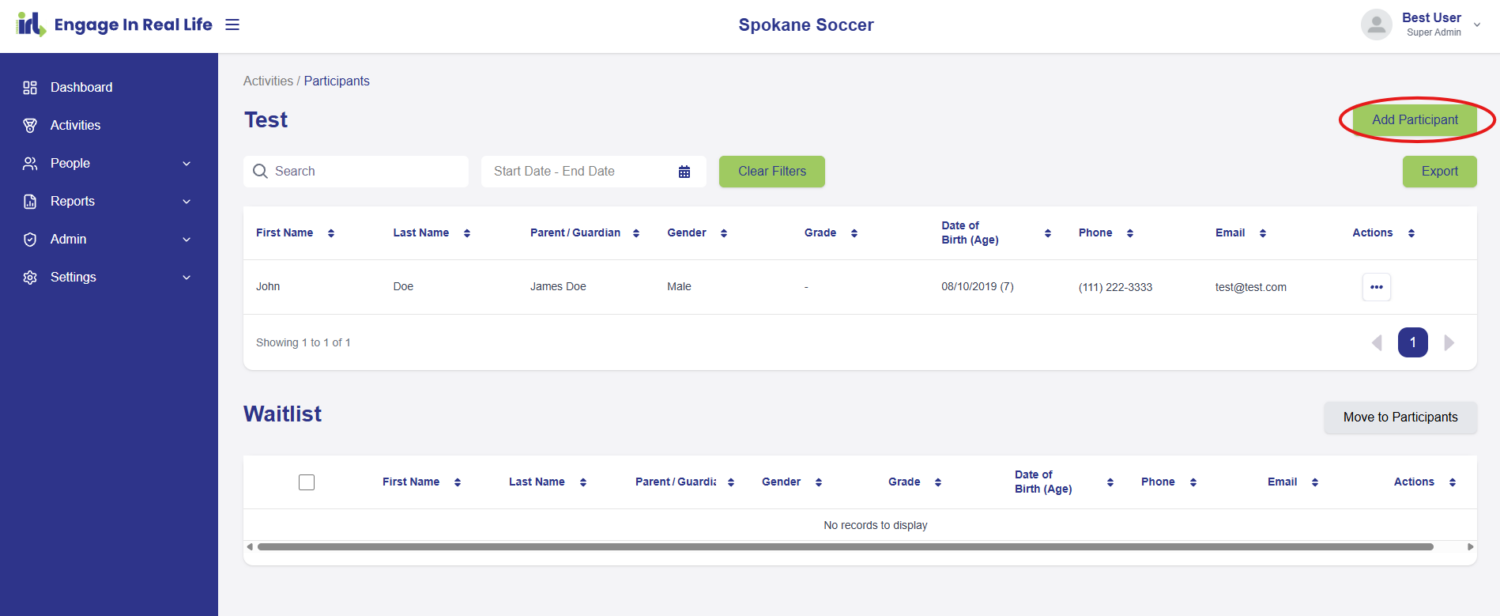
- Select “Activities” in the lefthand sidebar. Go to your desired activity and select the three dots under “Actions”. Select “Participants”. On the participants page, select “Add Participant” in the upper righthand corner. Then, select “Print Form” in the righthand corner of the page.
- Select “Reports” in the lefthand sidebar. Under Reports, select “Registrations”. In the upper righthand corner of the registrations page, select “Add Registration”. Begin typing your desired activity into the “Activity Name” field and select your activity from the dropdown list. After your activity is chosen, select “Print Form” in the righthand corner of the page.
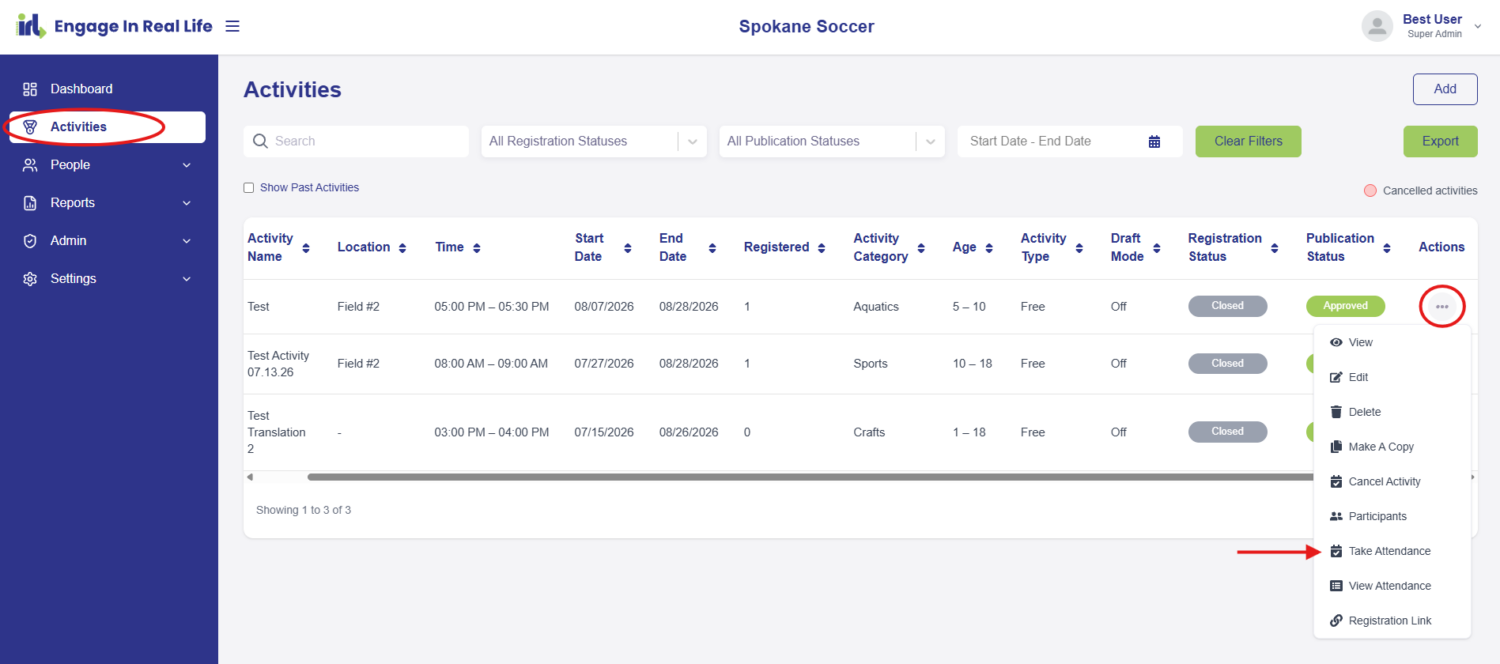
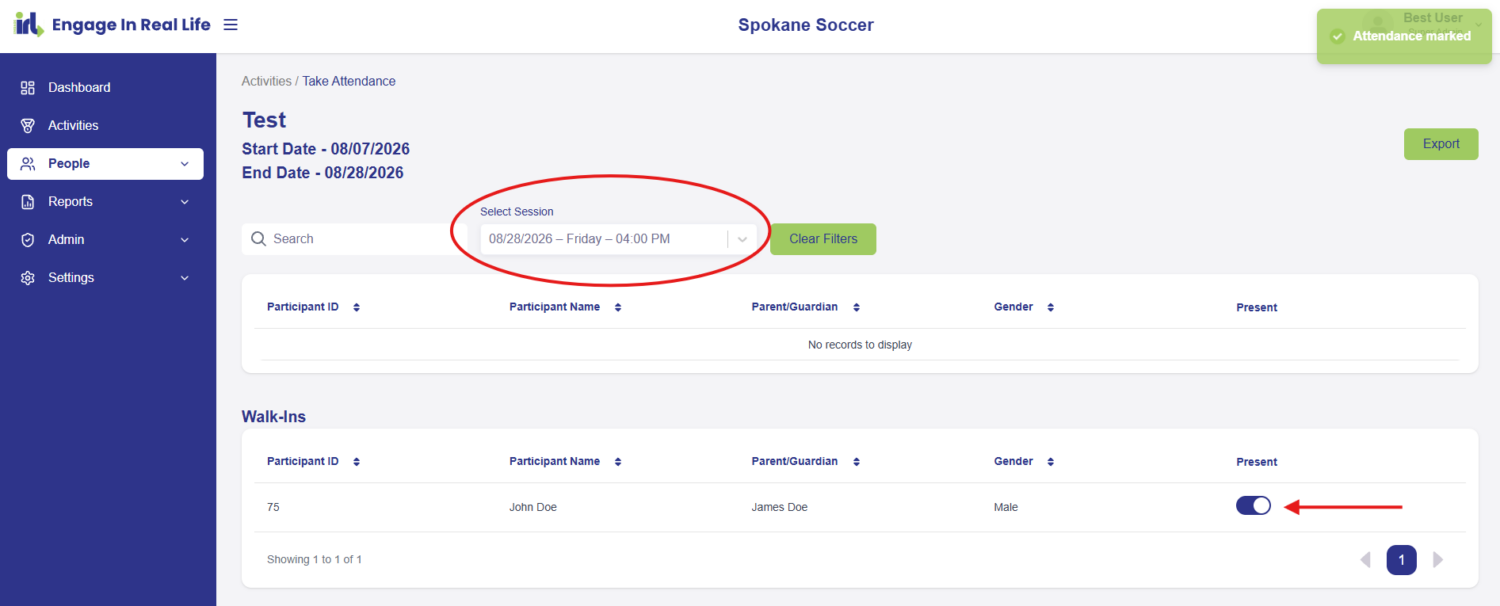
To take attendance for your activity, select “Activities” in the lefthand sidebar. Go to your desired activity and select the three dots under “Actions”. Select “Take Attendance”. On the “Take Attendance” page, you can select each session of your activity and take attendance for that day. Mark a participant as present by toggling the button under the “Present” column.
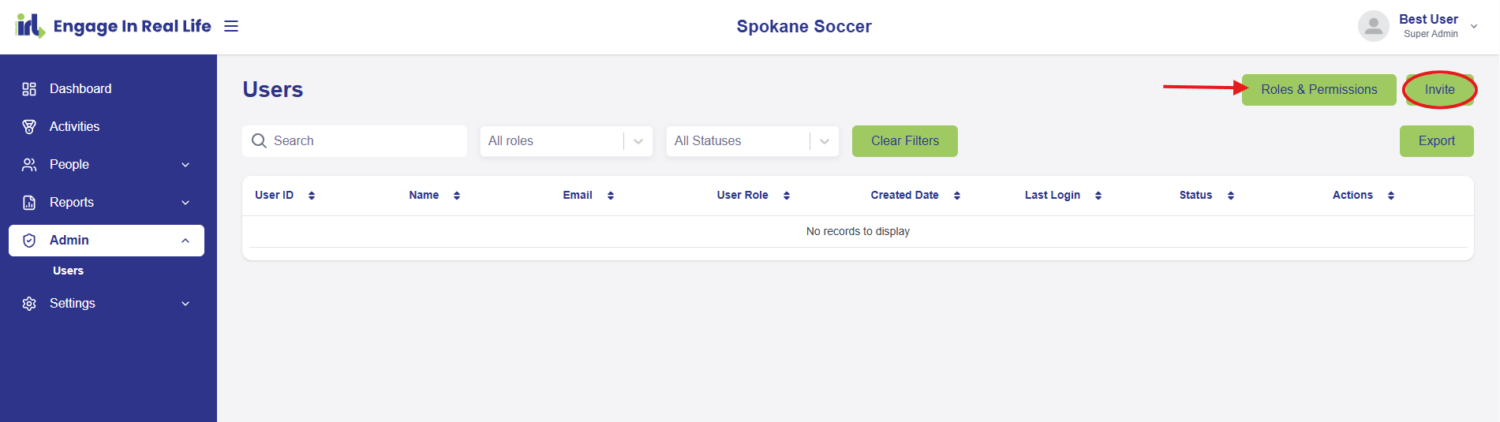
To invite new users to your organization, select “Admin” in the lefthand sidebar. Under “Admin” select “Users”. In the upper righthand corner, select “Invite”. After you enter your user details, select “Invite”. An email will be sent to the address provided for account activation.
Understanding User Roles & Permissions: Click “Roles & Permissions” on the “Users” page to view role descriptions and permissions lists.